 |
 |
 |
|
The defect = an imperfect "US" stencil which is an anathema in undead history....
This listing is for ONE shelter half.
Reproductions of the shelter half issued to US troops during WWII. This is the 2nd pattern, in olive drab no. 3, and both ends can be closed. These can be combined with a second shelter half to make a pup tent. First designed in late 1941 as the "New Type shelter half", these do not appear to have entered production until sometime in 1943. This design was far more practical than the earlier type in that one both ends could be closed. Why this seemingly simple innovation required the US Army 40 years to employ is yet another mystery lost to history. This same design, in the darker OD number 7, continued to be used until the 1990's.
See the pup tent listing for a complete tent (2 shelter halves, poles, pegs and ropes.)
This listing is for ONE shelter half. It takes 2 to make a tent.
Notes:
1. Each soldier was issued ONE shelter half. He was then to combine his with those of his fellow troops to pitch their tents.
2. Ropes, guy lines, poles and pegs sold separately.
3. Approximately 9 ft x 4.5 ft.
Getting the peg ropes though the grommets:
I found this to be a real S.O.B. of a job at first. After couple minutes of consternation, I double checked our rope and grommet sizes against the originals to be sure we hadn't measured incorrectly as it appears there is no way these will fit- but they do. Following more head scratching, I had a Macgyver moment and found a solution:
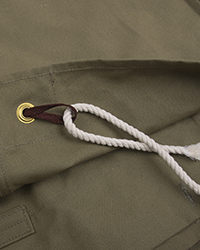
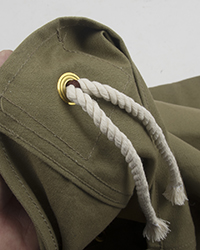
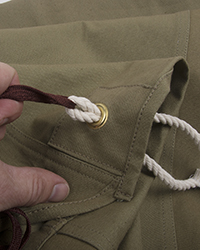
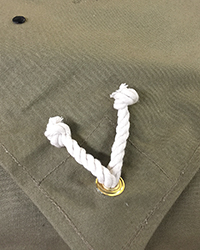
I'm not sure if this is the "1942 approved" method, but it works well. Use a standard G.I. shoe lace, feed it through from what you want to be the outside of the grommet (right and left halves will need to be threaded opposite from one another), loop the rope through it, and use the shoe lace to pull the rope through. You will still need to compress the rope at the tip as much as possible with your fingers, but this works far better than fingers alone. Once the rope is through the grommet, then knot each end to prevent it from slipping out or fraying.
|
|
|
|
Feed shoe lace through
the grommet from the
"outside"
|
Compress the end as
much as possible to
start it through
|
Pull through
|
Knot the ends
|
|
|
|
 |
|
 |
|
 SIGN IN
 SHOPPING BAG ()
 270.384.1965